Lightning McQueen Costume
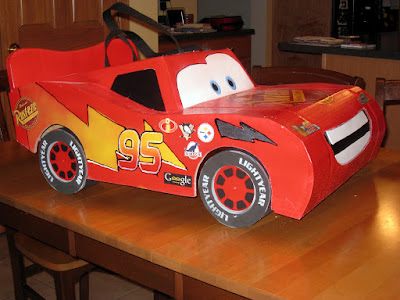
For Halloween this year, my youngest son decided to be Lightning McQueen from Pixar's "Cars" movie. Here are a few of the details of the costume construction process. First, a picture of the costume:

Using his matchbox-sized car as a model, I sketched out a profile of the body, and cut it out using a jigsaw. I used two sides of the box, one on top of the other to get two identical profile shapes. Additionally, I cut out a flat shape that I folded and glued into the top (cockpit?) of the car. I cut a hole in that top portion to fit around his waist.

Next, I attached the two sides by creating a front brace, and a rear spoiler. I wanted to make this part of the car slightly wider than the top I had already cut out to mimic the curves of the toy. I used hot glue for most of the cardboard assembly as it's strong enough sets up quickly.

Once I had the basic frame, I needed to attach the top of car to the frame. I created two braces by cutting long strips of corrugated cardboard. Each brace was made up of two strips: 1 long enough to go between the sides of the frame, and a slightly shorter piece to fit inside the top of the car. I glued the two strips together, leaving small ends that I bent at 90 degrees upwards and downwards respectively as gluing surfaces. These strips proved sufficient to keep the top in place until I could "skin" the frame to create a more rigid figure.

Next, I wanted to cover the top of the frame around the cockpit. I decided to do this with two pieces, 1 piece for the hood, and one piece for the sides and back of the car (between the spoiler and the cockpit). For both parts I cut pieces from thinner cardboard to allow it to bend around the curves of the frame more easily. Even with this, I pre-rolled the cardboard around a 4" piece of PVC to give it some curve. This ended up making a number of discrete bends in the cardboard as opposed to a smooth curve, but the effect is sufficient.
I cut the hood piece slightly wider than I needed to make it easier to glue on. I hot glued the edges a few inches at a time, held the top cardboard in place, and then moved on. Once I was all done, I went back with the jigsaw and trimmed off the excess. At this point, I also cut out a hole in the front of the car for Lightning McQueen's mouth.
I followed a similar process to skin the back half of the car, doing rough measurements to cut out the appropriate amount of material to fit around the cockpit of the car. There was a bit of fiddling around to get it fit, but close enough was good enough. With the top glued in place, the whole costume started to feel much less flimsy than before.

With the car taking shape, I wanted to do a little extra prep before painting. I covered all of the exposed cardboard edges with masking tape, leaving as few seams as possible. I also filled in a few of the small gaps around the cockpit of the car.
Now time to paint. I used two base coats of white primer (spray paint). It's hard to get a smooth looking finish on cardboard, so I wanted a good base. Next, I painted the entire costume bright red, leaving much of the windshield unpainted.

To create the eyes, I simply drew the shape I wanted at full size on a scrap piece of poster board, and cut it out. I placed the mask over the windshield, and sprayed it with white paint. After it dried, I saw a little paint had leaked under the mask creating a fuzzier line than I wanted, so I took the piece I had cut out of the poster board, laid it over top of the windshield, and sprayed around the edges again with red. This cleaned up the line nicely.
For the lightning bolts on the side, I masked them out using painters tape, and newspaper. I tried to achieve the gradient affect by spraying from front to back with the yellow paint, using less coverage as I went back.
I sprayed the numbers on the side of the car using a similar masking technique as I had for the windshield, again trying to get a bit of a gradient from yellow to red going upwards.
I used spray paint and small circular masks to paint the eyes (blue first, then a smaller black circle for the pupils). When they were dry, I added a bit of detail with a black sharpie, and a tiny dab of white paint in each eye for the specular reflection. I think that makes a huge difference.
At this point, I finished the mouth. For this, I glue a piece of black poster board to the inside of the costume covering the opening I had made for the mouth. Then, I cut out two strips of white craft foam for the top and bottom row of teeth, and glued them onto the poster board. Doing this as opposed to simply paint/drawing the mouth gives it a little extra depth.

I used some craft paints we had lying around to outline the numbers and lightning bolts, getting my kids to help along the way. In retrospect, I think this would have been better done with paint pens or sharpies, as the paint we were using had a tendency to glob as we were applying it, and it was pretty tough to get straight lines. But the kids had fun helping here, so I'm perfectly happy with it.
I was able to find a vector drawing of the Rust-eze logo online (brandsoftheworld.com), which I printed out for the hood. I placed it down originally using spray glue, but then went over the edges with Modge Podge to make it more secure.
For the racing sponsor logos behind the wheel wells on both sides, I simply printed out the graphics I wanted at an appropriately small size, cut them out, and applied the with Modge Podge. I had never used Modge Podge before, but it worked wonderfully. It acts as both a glue and a top coat/sealer, drying perfectly clear and giving the logos a laminated feel. I used the exact same process for the Rust-eze logos behind the rear wheel wells, and the back of the spoiler. For the iconic lightning bolts above the front wheel wells, I used aluminum foil, and more Modge Podge.

For the last of the body details, I masked off (using painters tape) areas for the side windows, and simply painted them black. I also created headlight graphics, and applied them with the same coating technique as the rest of the decals. After everything was dry, I sprayed the entire costume with multiple coats of clear high gloss finish for a nice shiny look. I'm also hoping this makes it more resistant to moisture in case there's a little rain.

For the wheels, I decided to make them have some real width as opposed to simply cutting out discs. I created the wheels by cutting out 8 circular discs, two for each wheel. I painted half of the discs red, and then added small black accents to make them look like hub caps.
I cut squares of 1" thick Styrofoam insulation, and used them to separate the two discs for each wheel. Then, I covered the outside of each wheel in black posterboard, using hot glue.
Finally, I cut out "tires" from 3mm black craft foam, and spray painted (again using a paper mask/stencil I created) the Lightyear logo around each. I glued a tire to each hubcap to finish the wheels.
I attached the wheels to the car by creating supports out of more cardboard. The supports are glued to the inside of the costume, and hang down to about the center of wheel wells. I then drilled a hole in each support, and ran a dowel rod through them. The wheels were then also drilled, and glued onto the dowel rod. It was difficult to get everything lined up center, but the wheels do partly spin. Ultimately, it was probably not worth the extra effort and complexity, but I'm not completely unhappy with the results.
In the end, this turned out better than I initially expected. The costume fits fairly well, and isn't too heavy (although a night of trick-or-treating will tell the real tale). Almost all of the materials I used I had lying around from previous projects, and so the cost was minimal (less than $15, mostly for paint and the dowel rods).


My basic concept was to create a Lightning McQueen car that he could wear around his waist, with straps over his shoulders as support. I decided to build it out of corrugated cardboard, which I hoped would be sturdy, but still reasonably light (and obviously easy to work with). I had an old large box made of double corrugated cardboard which had plenty of material.


I cut the hood piece slightly wider than I needed to make it easier to glue on. I hot glued the edges a few inches at a time, held the top cardboard in place, and then moved on. Once I was all done, I went back with the jigsaw and trimmed off the excess. At this point, I also cut out a hole in the front of the car for Lightning McQueen's mouth.
I followed a similar process to skin the back half of the car, doing rough measurements to cut out the appropriate amount of material to fit around the cockpit of the car. There was a bit of fiddling around to get it fit, but close enough was good enough. With the top glued in place, the whole costume started to feel much less flimsy than before.

Now time to paint. I used two base coats of white primer (spray paint). It's hard to get a smooth looking finish on cardboard, so I wanted a good base. Next, I painted the entire costume bright red, leaving much of the windshield unpainted.

For the lightning bolts on the side, I masked them out using painters tape, and newspaper. I tried to achieve the gradient affect by spraying from front to back with the yellow paint, using less coverage as I went back.
I sprayed the numbers on the side of the car using a similar masking technique as I had for the windshield, again trying to get a bit of a gradient from yellow to red going upwards.
I used spray paint and small circular masks to paint the eyes (blue first, then a smaller black circle for the pupils). When they were dry, I added a bit of detail with a black sharpie, and a tiny dab of white paint in each eye for the specular reflection. I think that makes a huge difference.
At this point, I finished the mouth. For this, I glue a piece of black poster board to the inside of the costume covering the opening I had made for the mouth. Then, I cut out two strips of white craft foam for the top and bottom row of teeth, and glued them onto the poster board. Doing this as opposed to simply paint/drawing the mouth gives it a little extra depth.
At some point, I added straps by simply running nylon strapping down through the top of the cockpit, and hot gluing the ends inside the costume. I glued the straps so that they cross in the back, so that they won't slip off of his shoulders. The toughest part of this job was getting my son to stand still long enough for me to get the length of the straps right.

I was able to find a vector drawing of the Rust-eze logo online (brandsoftheworld.com), which I printed out for the hood. I placed it down originally using spray glue, but then went over the edges with Modge Podge to make it more secure.
For the racing sponsor logos behind the wheel wells on both sides, I simply printed out the graphics I wanted at an appropriately small size, cut them out, and applied the with Modge Podge. I had never used Modge Podge before, but it worked wonderfully. It acts as both a glue and a top coat/sealer, drying perfectly clear and giving the logos a laminated feel. I used the exact same process for the Rust-eze logos behind the rear wheel wells, and the back of the spoiler. For the iconic lightning bolts above the front wheel wells, I used aluminum foil, and more Modge Podge.


I cut squares of 1" thick Styrofoam insulation, and used them to separate the two discs for each wheel. Then, I covered the outside of each wheel in black posterboard, using hot glue.
Finally, I cut out "tires" from 3mm black craft foam, and spray painted (again using a paper mask/stencil I created) the Lightyear logo around each. I glued a tire to each hubcap to finish the wheels.
I attached the wheels to the car by creating supports out of more cardboard. The supports are glued to the inside of the costume, and hang down to about the center of wheel wells. I then drilled a hole in each support, and ran a dowel rod through them. The wheels were then also drilled, and glued onto the dowel rod. It was difficult to get everything lined up center, but the wheels do partly spin. Ultimately, it was probably not worth the extra effort and complexity, but I'm not completely unhappy with the results.
In the end, this turned out better than I initially expected. The costume fits fairly well, and isn't too heavy (although a night of trick-or-treating will tell the real tale). Almost all of the materials I used I had lying around from previous projects, and so the cost was minimal (less than $15, mostly for paint and the dowel rods).

WOW!! Any chance you are willing to sell the costume? My 3 year old would love this costume and I don't think I could even begin to make it look like this. Let me know if you're interested in selling!!
ReplyDeleteWow! Great post. My son wants to be this for Halloween... So you really helped!
ReplyDeleteNot sure if you are checking or replying to comments, but just curious what the approximate dimensions are? Width mainly. We are going to attempt a go at making one for our 3 1/2 year old.
ReplyDeleteUnfortunately, I don't know the dimensions, and I don't have the costume anymore to check. You can get a rough estimate from looking at some of the pictures above...specifically by looking at the "cockpit" with the hole in the top. The hole was just wide enough to fit around his waist, and the whole costume was maybe twice as wide as that hole.
DeleteIf you do end up making one, I'd love to see a picture!
Hi Amanda,
DeleteMy husband just free-handed the side profiles and then we measured our son to see how wide/long we wanted it. Ours is about 21" wide and 40" long. When we measured his little LM car (the little 2 dollar one at Wal-Mart) the width was roughly half of the length...so we went with that. =o)
We are making one this Halloween also. We are about the start painting! Anyway, I found someone who had done a LM cake and had graphics files for all the logos. I contacted him, and he sent me this link to a forum where people were recreating the logos and posting the files! All of LM's logos are there...You can just save the files, and then print them in the size you need to modge podge them on! I'm hoping Staples won't give me any trouble having them printed, I don't think my printer would keep up. =o) Good luck!
ReplyDeletehttp://carsthetoys.yuku.com/topic/3865/LOGOS-LOGOS-LOGOS-Updated-3-5-2011?page=1#.UITMn7TT97Y
If you're willing, post a picture when you're done...I'd really like to see what you end up doing.
DeleteWill do! Thanks for posting yours! I would not have been able to figure it out without some pictures! =o)
DeleteI'm giggling because I pinned this on 10/11 and there were no comments here. So glad others have now found this. @Jelena-so glad to look up that site later since I've been trying to recreate the wheel for weeks!
ReplyDeleteI am having trouble finding files for the head and tail lights. Can't seem to find anything I can enlarge to the right size. You wouldn't still happen to have those kicking around, would you?
ReplyDeleteHmmm...I sure don't. If I remember correctly, I just did a google image search for "headlight" (or something similar), and looked for the first thing that would work.
DeleteHi There! Finished up the car last night, and "drove" it tonight. Turned out great! We did a few things differently. I had to hand paint both sets of lightning bolts on, as the tape was pulling up the red paint. I had the logos printed at Staples and Modge Podged them on. We also cut a long rectangular piece and just shaped it to the sides of the car, then cut circle out of that piece and the cab piece, that way I didn't have to cut pieces to "frame" around the cab.
ReplyDeleteTurned out well, everyone loved it. We had a few people ask to take pictures! =o)
Thanks for the inspiration!
Pics Here:
https://picasaweb.google.com/nenabeena/DIYLightningMcQueenCardboardCar?authuser=0&feat=directlink
Wow! I'm *super* impressed. It turned out fantastic; no wonder you got so many positive comments.
DeleteSounds like you made some good improvements. I noticed in the pictures that you used what looks like part of a yard stick to attach the wheels. What a good idea! I bet that help keep them nice and sturdy too. I've seen people use paint stirrers for that kind of thing too...
Thanks so much for sharing the pictures. The thing I love about making Halloween costumes is that they are always so unique, and usually turn out better than the things you could buy. That certainly seems true in your case.
The yard sticks were on sale for 50¢, so we thought that would be a cheap way to help give it some strength. My Husband works at LOWES in the mornings unloading their trucks, and was able to get us a sheet of cardboard that was probably about 10ft tall and 12 feet wide for free. Apparently they use these to separate the freight on their trucks and then just recycle or throw them away when they are finished with them.
DeleteThe wheels don't move, we just cut out foam board that was circular on the bottom, and square-ish on the top and then glued them to the inside of the car, I worked up the wheel design in Photoshop, then printed them and modge podged those on also. After I painted the bolts I outlined them with a sharpie, that worked really well, thanks for the tip. We used metallic paint for the little lightning bolt, so it would be a little reflective.
I'm definitely a fan of making costumes, I've made them all the last few years that I have had kids, but most of them have been sewing projects. I'm glad I was crazy enough to look at your pictures and think I could build this....he loved it. Thanks for making it look do able! =o)
Jelena for the win! Your costume is amazing!!
DeleteI finally posted pics of the one I managed to eek out: http://www.otherpiecesofme.com/2012/12/so-many-hours-of-my-life-i-will-never.html
Thanks so much for your amazing inspiration.
Not sure if you still check this, but I am working on one for my son. I am having a tough time with the font for the LIGHTYEAR on the tires. Any suggestions?
ReplyDeleteIt's been long enough that I honestly can't remember how I created that stencil, or what font I used. One thing you can try is a site like http://www.identifont.com/ which will help you identify a probable match. Unfortunately, there aren't a lot of letters to go off of in "LIGHTYEAR". I did find this which might be close enough: http://www.myfonts.com/fonts/efscangraphic/koloss-sb/
DeleteHope that helps.
Used your inspiration - thank you so much!!!! Photots on Pinterest: http://www.pinterest.com/pin/458804280759939481/
ReplyDeleteI gotta say, when my 3yo son said he wanted to be Lightning McQueen for Halloween this year I asked myself, "How the heck are we going to do that?". A quick Google search for homemade Lightning McQueen costumes and I came across your amazing step by step photos. I made his costume and have to admit that it was a huge hit. One of his friends at school was a race car driver and he sooo wanted to be in my son's costume :-)
ReplyDeleteA couple things:
- I had a false start - made it too long, but once I got that figured out things went pretty well.
- I started by just connecting with duct tape. I actually took some of it off later on and hot glue-gunned some of the seams.
- I used suspenders to keep the costume on him. Really good idea for ease of attaching, although I should have added some duct tape earlier than I did to strengthen the edges of the hole where he was. (BTW - did I mention I love red duct tape) :-)
- Spray paint melts styrofoam! New thing I learned. That's ok - got some latex paint and we were good to go after that. I used red paper plates for the wheels.
- Thanks to Jelena for posting the link to the stickers. I basically printed those out (and the 95s). I also added some local flavor - a Longhorn for our favorite college team, a Ram for his school mascot, and the logo for our neighborhood's community association.
All in all, I loved making this costume and so thanks for the inspiration. If you want to check out pix, you can find them here:
http://squidbits.typepad.com/squidbits/2013/11/when-a-project-becomes-an-obsession-the-making-of-lightning-mcqueen.html
I gotta say, when my 3yo son said he wanted to be Lightning McQueen for Halloween this year I asked myself, "How the heck are we going to do that?". A quick Google search for homemade Lightning McQueen costumes and I came across your amazing step by step photos. I made his costume and have to admit that it was a huge hit. One of his friends at school was a race car driver and he sooo wanted to be in my son's costume :-)
ReplyDeleteA couple things:
- I had a false start - made it too long, but once I got that figured out things went pretty well.
- I started by just connecting with duct tape. I actually took some of it off later on and hot glue-gunned some of the seams.
- I used suspenders to keep the costume on him. Really good idea for ease of attaching, although I should have added some duct tape earlier than I did to strengthen the edges of the hole where he was. (BTW - did I mention I love red duct tape) :-)
- Spray paint melts styrofoam! New thing I learned. That's ok - got some latex paint and we were good to go after that. I used red paper plates for the wheels.
- Thanks to Jelena for posting the link to the stickers. I basically printed those out (and the 95s). I also added some local flavor - a Longhorn for our favorite college team, a Ram for his school mascot, and the logo for our neighborhood's community association.
All in all, I loved making this costume and so thanks for the inspiration. If you want to check out pix, you can find them here:
http://squidbits.typepad.com/squidbits/2013/11/when-a-project-becomes-an-obsession-the-making-of-lightning-mcqueen.html
Thanks so much for sharing your costume. I really like the "local flavor" for the decals...makes it so much more unique and special.
DeleteThank u so much for sharing the costume.. I have a very little time left for my sons fancy dress.. Can u please send me the individual measurements of the pieces and how its done. Please send it to my mail. vamsikrishna3@gmail.com
ReplyDeleteI know we're a bit late to the party, but we just made one for our three-year-old and this blog was invaluable for the design. THANK YOU!
ReplyDeleteJust made a similar one for son's school competition. This blog was a great reference point.
ReplyDelete